How to…
Process Month End And Year End
For use with LexisNexis Front Office Powered by Time Matters®. LexisNexis is a registered trademark of Reed Elsevier Properties, Inc., used under license. Time Matters is a registered trademark and Billing Matters is a trademark of LexisNexis, a division of Reed Elsevier, Inc. All Rights Reserved.
This material is owned by Kathy Burger Consulting, LLC, and is protected by copyright. Reproduction or distribution without the permission of the owner is prohibited.
The first thing you should know is that I AM NOT an accountant nor am I a tax specialist. In my years of working for and with law firms, with various accounting and billing softwares, I have found processes that work well, and I want to share those with you. For initial setup, and accounting and tax advice, you should enlist the services of a CPA.
This Paper is divided into three sections. Section One provides a description of referenced reports, along with any available filters, and sort options. Section Two is a suggested checklist of sequential tasks to complete a monthly billing cycle. Section Three covers Year End processing and suggestions.
The most successful office procedures always include cross-checks; comparisons of lists and reports that confirm correct data entry. For instance, the total of client checks taken to the bank should be the same as the bank deposit report. The Invoice Listing should agree with the transaction listing, filtered for invoices only, for the same period.
This Paper hopes to provide a backbone of monthly reporting. There are many other reports available which, though not listed here, should not be ignored. Reports are a valuable management tool for helping to make decisions on everything from human resources to marketing.
In the most general terms, processing a billing cycle consists of the following:
· Confirm the status and accuracy of unpaid bills prior to generating new bills
· Confirm the previous month receipts are accurately recorded
· Quantify and qualify current unbilled time and expense entries (billing items)
· Confirm client accounting information is up-to-date (payments, write-offs, etc.)
· Determine the value of the current billing cycle
· Produce and post accurate client bills
Unless otherwise noted, the reports suggested here are included with your program, and are accessed from the top menu item, Reports, by selecting from the dropdown Standard Reports. Examples are taken from the Training Mode.
Three main internal departments are defined. Generally ‘Staff’ refers to timekeepers who work on files; ‘Accounting’ refers to anyone entering expenses, applying payments, and handling the firm checkbook(s); and ‘Management’ refers to administrators, partners, or other decision-makers.
Use this paper as a aide in helping you develop your own set of procedures. Each month the checklist should be reviewed and modified to fit your particular needs.
Tip: Create QuickTabs on the Billing Item list; one to list unbilled time, and one to list unbilled expenses. Use these lists to confirm all unbilled entries have a valid staff ID, matter ref., rate, total duration, etc. Using the lists can help you locate problem entries and avoid re-prints. Save a tree!!
Section One
REPORTS
Because reports are a snapshot of a moment in time, I recommend you always save your critical Month and Year End reports as PDFs. Create a folder, 2009 Reports, and name the reports so that you can easily determine the data represented. For instance, 2009-03-31 ME Productivity by Originating, or 2009-04-30 ME AR by Client.
Productivity
This report is available from both the Billing and Staff Tabs. The report provides worked and billable time information for a specified date range. ‘Staff’ refers to the working staff.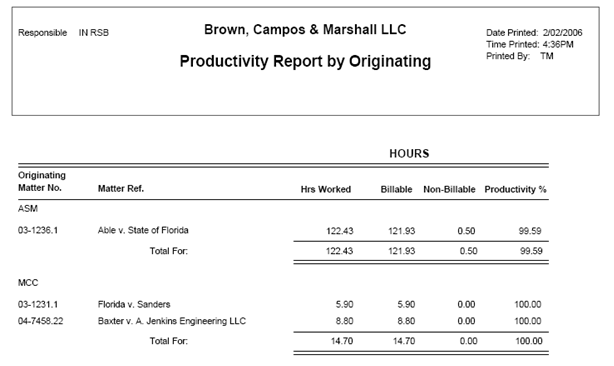 This report provides hours worked for the timeframe selected, and distinguishes billable (entries where the bill status is ‘billable’ or ‘no charge’), and non-billable (entries where the bill status is ‘do not bill’, as well as the percentage of productivity (billable hours divided by hours worked).
In the above example, the report was run from the Billing Tab. A filter of ‘Responsible Staff equals RSB’ was chosen, and the report is sorted by Originating Staff. The date range was left at the default, ‘All’.
Profitability
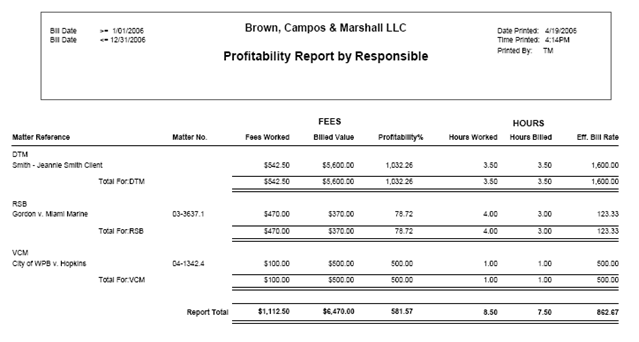
This report is available from both the Billing and Staff Tabs, and provides worked and billable time value information based on a specified date range.
This report provides total value of Fees Worked, the Billable Value, Profitability percent, (of the value worked, the percentage that is billable), as well as Hours Worked, Worked Hours that are billable, and the Effective Bill Rate (the billable value divided by the billable hours).
Filter the report by billing item fields such as Bill Date, Matter Ref., Staff, Classification Code, Billing Code, Phase Code, and/or the Originating or Responsible Staff on the General Tab of the Billing Preference. From the Billing Tab, sort by Billing Code, Client, Client/Matter, Matter Number, Originating Staff, Phase Code, or Responsible Staff. From the Staff Tab, sort by Originating/Staff, Responsible/Staff, or by Staff.
Important Note: This report shows exact, potential bill values. It does not take into account flat fee or other adjustments to values until the entries are actually billed. Look at the City of WPB v. Hopkins entry. Had a $500.00 flat fee amount not yet been billed, the worked and billed columns would be showing the same values. Once an amount is posted to a bill, these numbers change based upon the allocation of any adjustment, be it a flat fee, markup, discount, or action.
Receipt Allocation
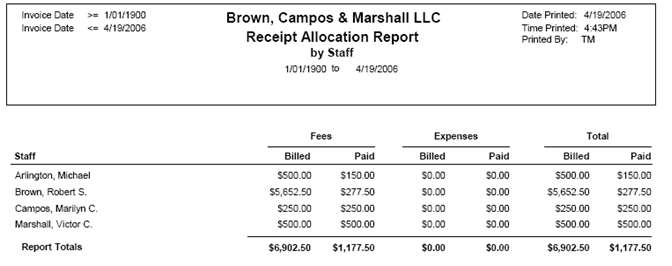
This is my favorite report. This report is available from the Transaction tab. It reflects allocation of payments to the billing items which were included on the invoice being paid. Select the date range of payments to be reported on.
The Receipt Allocation Report provides individual and totals of payments applied to billed Fees and Expenses. It can be sorted by billing item fields Billing Code, Client, or Working Staff, [the staff whose ID appears as the primary (first) staff].
Filter options are Client, Matter, Matter Number, Staff, Classification Code [of the billing item(s)], and Responsible Staff. The report shows the billed value of time and expense items which appeared on the invoice to which a payment has been applied, (NOT the amount BILLED in the selected timeframe, the amount on the bill being PAID in the selected timeframe). The date range reflects the date on the payment record.
Note: If you have matters with a billing arrangement of flat fee (one time charge, or flat charge, or bill in advance), and no billing items are entered prior to posting a bill, payments entered will not be allocated to a staff. Likewise, unless a default billing code is specified at program level setup,(file> setup> general> program level/billing tab/billing tab, ‘default billing code for flat charge allocation’), no billing code will get a receipt allocation. The allocations will appear on the report, but the staff or code will be blank. For this reason, I recommend at least one time billing item be included on flat fee bills.
Work In Progress
There are several variations of the WIP report available, in both detail and summary. The report to print depends largely upon the needs of your audience.
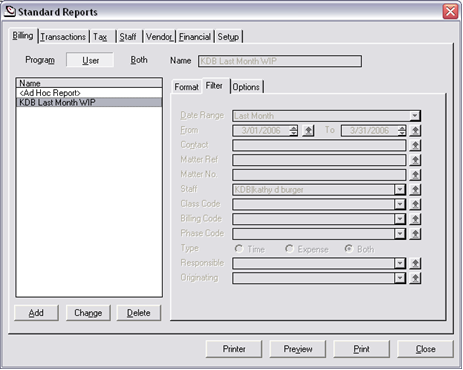
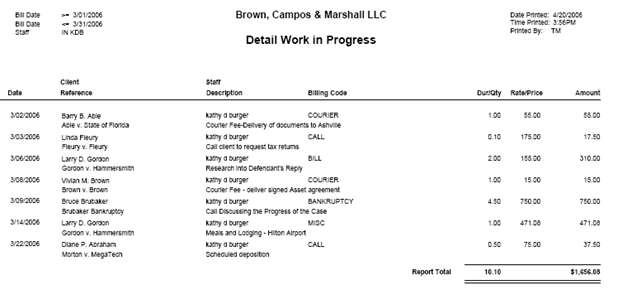
For Staff, prior to management review, and prior to printing pre-bills or bills, print, from the Billing Tab, the Detail Work in Progress Report. Select the date range (typically ‘last month’), and print the report for each staff member.
Tip: Save report preferences for repeat printing by clicking the ‘Add’ button, and providing a name for the report.
The report lists bill date, client/matter, staff/description, billing code, if any, the billable duration (or quantity), the rate (or price), and the billable value. Using this report, staff can confirm their own billing items are correctly entered.
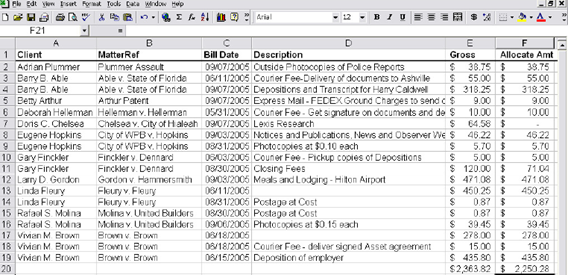
Note: If not already on the toolbar for the Billing Item list, add the button, ‘Send to Excel’. (User level setup.) Tag desired records, (unbilled expenses, for instance), and create an Excel spreadsheet that includes those records. In Excel, use the Auto Sum button to quickly and easily get totals. (Change the format of the value columns to dollars.)
See how easy it is to find items with no description from the list!
Note: The spreadsheet will have the same sort selection and columns and as the Billing Item list.
Transaction Listing
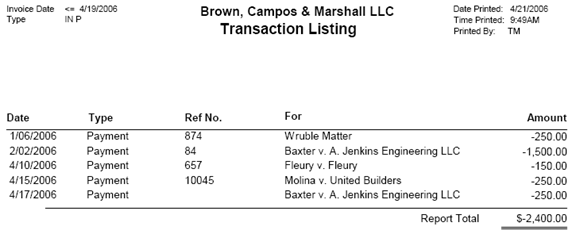
This report is on the Transactions tab, and shows details of transactions for the selected date range and type(s).
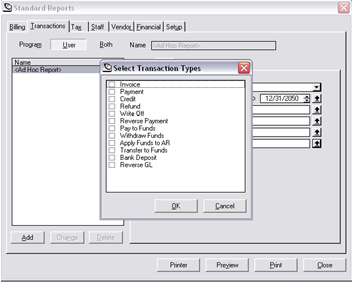
Filter for date range, client, matter ref., or matter number. Click the up arrow to the right of ‘types’. Check the box to the left of each transaction type to be included in the report.
Tip: This is a good report to run whenever you need to see a ledger of transactions for a particular client or matter. Let the report default to all transaction types.
The listing shows the transaction date, type, any reference information, (check number, invoice number), the matter reference, and the total amount of the transaction. Bills and invoices are positive numbers (increase AR), and payments, credits, and write-offs are negative numbers.
Write-Up/Write-Down
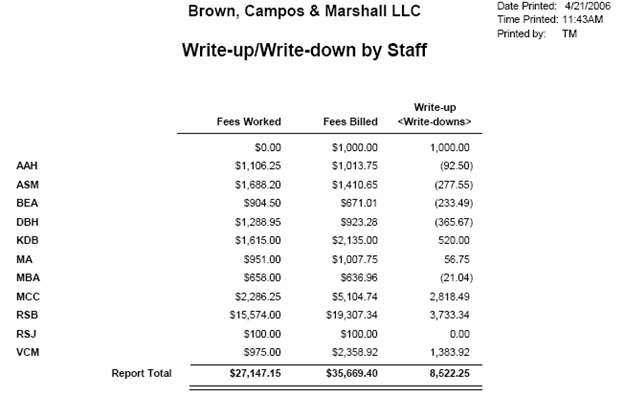
This report is on the Transactions tab, and provides the difference between the value of billable time worked, and the value that has been, or will be, billed.
Filter by billing item fields including Date Range, Contact, Matter, Matter Number, Staff, Classification Code, Billing Code, or Phase Code, and choose to include values of records that are billed, unbilled or both. On the Options tab, sort by Billing Code, Client, Client/Matter, Matter Number, Originating Staff, Phase Code, or Responsible Staff.
Note the example above is sorted by staff, and the top line shows a value with no associated staff. That number represents a flat fee billing where no billing item was on the bill.
Pre-Bills and Bills
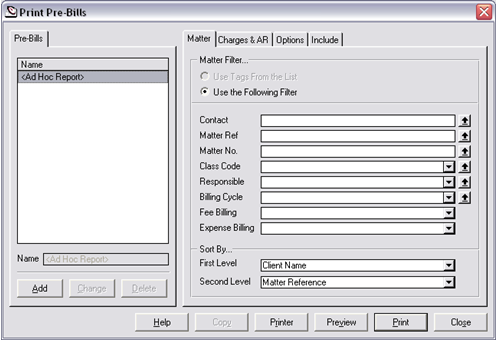
The ‘Print Bills’ and ‘Print Pre-Bills’ dialogue boxes are very similar. The ‘Matter’ tab filters for particular matters, and sets the print order. There are two levels of print order available. The default is ‘Client Name’, then ‘Matter Reference’. You can also choose ‘Matter Number’ and ‘Responsible Staff’ at either level.
The ‘Charges & AR’ tab filters for particular billing items on those matters.
The ‘Options’ tab allows for including matters with no WIP. And, when printing Pre-Bills, an ‘Include’ tab allows for suppressing the printing of various sections.
At the bottom of the dialogue box, use the ‘Printer’ button to select a printer other than the windows default printer, and set any printer options. Use the ‘Preview’ button to print to screen. Use the ‘Print’ button to print to a printer. Use ‘Close’ to close the dialogue box.
As with other report print screens, to the bottom left click ‘Add’ to save the report definition.
Section Two
MONTH-END PROCESSING
BEFORE BEGINNING THE BILLING CYCLE
Print the Following Reports Using the Pre-Defined Date Range ‘LAST MONTH’:
This sequence assumes you are in the first days of a new month, preparing to bill time and expense records through the prior month-end date.
Print the Following Suggested Reports for LAST MONTH:
For Staff:
Billing Tab – Detail Work in Progress
Run an individual report for each timekeeper
Make any necessary changes after staff review, and prior to printing reports for management.
For Accounting:
Transaction Tab – Transaction List
Filter for Date Range ‘Last Month’ and Type ‘Apply Funds to A/R’
Confirm all applications have been processed in the fund bank
Transaction Tab – Fund Activity with Balance Report
Confirm agreement with bank balance
Make any necessary changes AFTER accounting review, and PRIOR to printing reports for management.
For Management:
Staff Tab – Hours Recap by Staff
Sort Option by Staff
Billing Tab – Productivity
Sort Option Client or Client/Matter
Billing Tab – Aged Accounts Receivable Summary
Sort Option Client, Matter, or Responsible
Transaction Tab – Transaction Listing – Print Individual Listings
Filter for date range ‘Last Month’
Select Type ‘Payments’
Select Type ‘Pay to Funds’
Select Type ‘Write Off’
Billing – Paper Driven
Print Pre-Bills
Date range 1/1/1900 through the month-end date
Print in groups that help manage distribution and processing
Select the desired sort
The default is ‘Client Name’, ‘Matter Reference’. I prefer ‘Matter Reference’ so the Pre-Bills (and, when I print them, Bills) are ordered Alphabetically – the same way the matter list is sorted
Create BillFlow Manager collection(s)
Create collections which mimic the pre-bill printing
As pre-bills are reviewed, marked-up, and processed, those NOT returned will maintain a status of ‘new’, promoting easier follow-up
Billing – Paperless
Create BillFlow Manager collections
Create collections by responsible staff
Print BillFlow Collection reports
Select file> Print BillFlow Collection while on the ‘New’ tab for each collection.
Distribute reports to each responsible staff
Assumes responsible staff do their own edits.
Billing – All
Perform Any Edits
From the BillFlow Manager Collections, modify time/expense entries as needed
Change Status
Change status to ‘Ready to Bill’ as you go
Print BillFlow Collection report
Print while on ‘Ready to Bill’ tab
Note: You must print this report PRIOR to printing bills
Create Bills
From the ‘Ready to Bill’ tab, hit control+T (tag all), and select ‘Bill’ to print bills
Place in ‘final review’ if another review is required
Post Bills
From the ‘final review’ tab, hit control+T (tag all), and select process, ‘Post’.
Once the bills have been approved and put in the mail, post them
Note: Bills do not appear as AR, and cannot have payments or credits applied until they are posted.
AFTER THE BILLING CYCLE
Print Following Reports for DATE RANGE OF CURRENT MONTH
Accounting:
Transaction Tab – Transaction Listing
Select Type Apply Funds to AR
Transaction Tab – Invoice Listing
Management:
Transaction Tab – Invoice Listing
Another good option is to go to the invoice list. Filter for the current month invoices. Displaying the columns Fees, Expenses, Invoice Total, and Balance, tag all and ‘send to Excel’. In this way you can auto-sum the columns. If the Excel button is not on the invoice listing, click the options button, select list toolbar, and add it.
Section Three
CLOSING THE YEAR
When it comes to your financials, your firm’s Accountant should always have the final word. The accountant should have been consulted during the initial setup and should review your financial reports, including bank statements, on a regular basis.
The Billing Matters program does not have a true Month or Year End processing. This affords the opportunity to make corrections to prior month and even prior year numbers, when necessary. It also means that care must be taken to limit unwanted changes from being affected.
As with Month End, you’ll want to confirm the Year End numbers are accurate. Here are some simple steps to take.
Print the General Ledger (or Save as PDF) and review the transactions to all the banks, and all the expenses. Check things like the rent expense account, which should show a debit for each month of the year in approximately the same amount. Check other accounts such as utility expenses such as electric and phone charges to be sure there is an entry for each month. You don’t want to miss any tax deductions.
If you find anything that seems amiss, print (or Save as PDF) the General Journal, sorted by Ref Number. This will show the corresponding debits and credits for each transaction.
It’s a good idea to save both the detailed GL and the GJ for the year. They can be quite large, but are invaluable when trying to explain entries. I create a folder for Year End Reports, and save it to at least two locations; a local disk and the shared network drive.
Once you are satisfied with those reports, and have made any necessary adjustments:
Print the Trial Balance through the Year End Date
Print the Balance Sheet through the Year End Date
Print the Profit and Loss (Income) Statement for the Year.
The trial balance will list the balance of each General Ledger Account as of the date selected. The accounts will list in this order: Assets, Liabilities, Equity, Income and Expenses.
In the Equity area, you’ll find Retained Earnings. Retained Earnings is the net of income and expenses, and will be the bottom line on the Income Statement. The balance of Retained Earnings needs to be ‘distributed’ to the company owners. For Partnerships, it is Partner Equity, and for Sole Proprietorships, it is Owner Equity. For instance, assume the company is an LLC, it is the end of 2008, and there are three equal partners in the following example:
Retained Earnings is a Net Income 1/1/08 to 12/31/08 of 9,000.00. This is the bottom line of the Income Statement when run for the year, and is the Retained Earnings number in the Equity area of the balance sheet. If it is not, you must determine why and correct.
To distribute to Partner A, Partner B, and Partner C, enter a general journal entry dated 12/31/08. Debit Retained Earnings 9,000.00 and credit Partner A Equity 3,000.00, Partner B Equity 3,000.00 and Partner C Equity 3,000.00. The retained earnings account will now have a 0.00 balance as of the last day of the year Another approach is to create in the equity section of the chart of accounts a ‘Retained Earnings 2008′ account and credit that account rather than the equity account(s), but eventually all Retained Earnings should be distributed to owner accounts. As a solo company, I create a new GL account each year in the equity area. I created ’2008 Retained Earnings’ and did journal entries to allocate income to that account. In this way the Retained Earnings account always only shows the current year, and matches what is on the income statement for the current year.
Note: If the Income Statement reflects a net LOSS, Credit Retained Earnings and Debit the Equity accounts.
Compare the End of Year Cash balance to the December year end Bank Reconciliation.
Compare the End of Year Trust Balance to the December year end Bank Reconciliation.
Compare the End of Year Trust Liability to the Trust Balances by Matter report.
Note: When running the Trust Balances by Matter report using an ‘as of’ or ‘end’ date, you’ll need to check the box to ‘include matters with zero balance’. Otherwise, matters that had a balance as of 12/31/08, but are at a zero balance on the current date will not be included in the report.
Print 1099s for all vendors who are not corporations, and were paid 600.00 (or the current IRS mandated amount) or more by the firm. Print the detailed AP report by vendor to confirm the 1099 numbers are correct.
Compare the Taxes Paid and Wages Paid to the Report provided by your payroll preparer.
Print the Working Trial Balance and present it along with the other financials to your accountant for final year end adjustments. After making those adjustments, print the Balance Sheet and Income Statement one last time and save to disk.
To obtain a PDF version of this document, click here: Suggested Billing Matters Month-Year End Processing
To obtain a PDF copy of this and other handouts for free, contact Billing Matters CIC, Kathy Burger
